
Now we are on the stage where need to install the Web Server (Home Web Server to be precised). Talking about webserver we have a lot of choice which depends to our preference.
Since Raspbian OS is based on Ubuntu, so i will take out IIS option, then we still have other option like Apache, Nginx, Lighthttpd, Apache Tomcat, OpenLiteSpeed etc.
If i say that Apache is older web server (release at April 1995) while Nginx is younger (release at October 2004). Apache as Web Server is more mature, Apache also release many other cool Open Source Application under Apache Foundation. While Nginx recently acquire by F5 that has been well knows as Load Balancer solution. Back in 2004 I used F5 Big IP Appliance that run BSDI before BSDI acquired by WindRiver.
Next important component is SSL Certificate, how we manage to get the certificate:
- Self signed Certificate
the easiest way to get the certificate where we have flexibility defining certificate validity, but it is not signed by Certificate Authority
- Purchase SSL certificate from 3rd party SSL provider
If it is only for single FQDN like www.iolib.link, the cost is not much, but if we want to have valid SSL Certificate for other FQDN then we need to allocate additional budget for it. Other option is to get wildcard certificate but price is not cheap anymore. Also bear in mind that we have renew the certificate annually.
The amount of SSL Certificate renewal can be used to buy Sensors for Raspberry Pi and we can play more.
- Free SSL Certificate
Personally i prefer this option where we can get Valid SSL Certificate and it is free. One of the provider for this option is Letsencrypt.
As i remember Letsencrypt gave 1 year Certificate validity before, but now change to 90 days. But good thing is Letsencrypt provide cron tab that automatically renew the certificate. It is the reason why i do not terminate SSL connection at HAProxy, but doing the termination in the backend server.
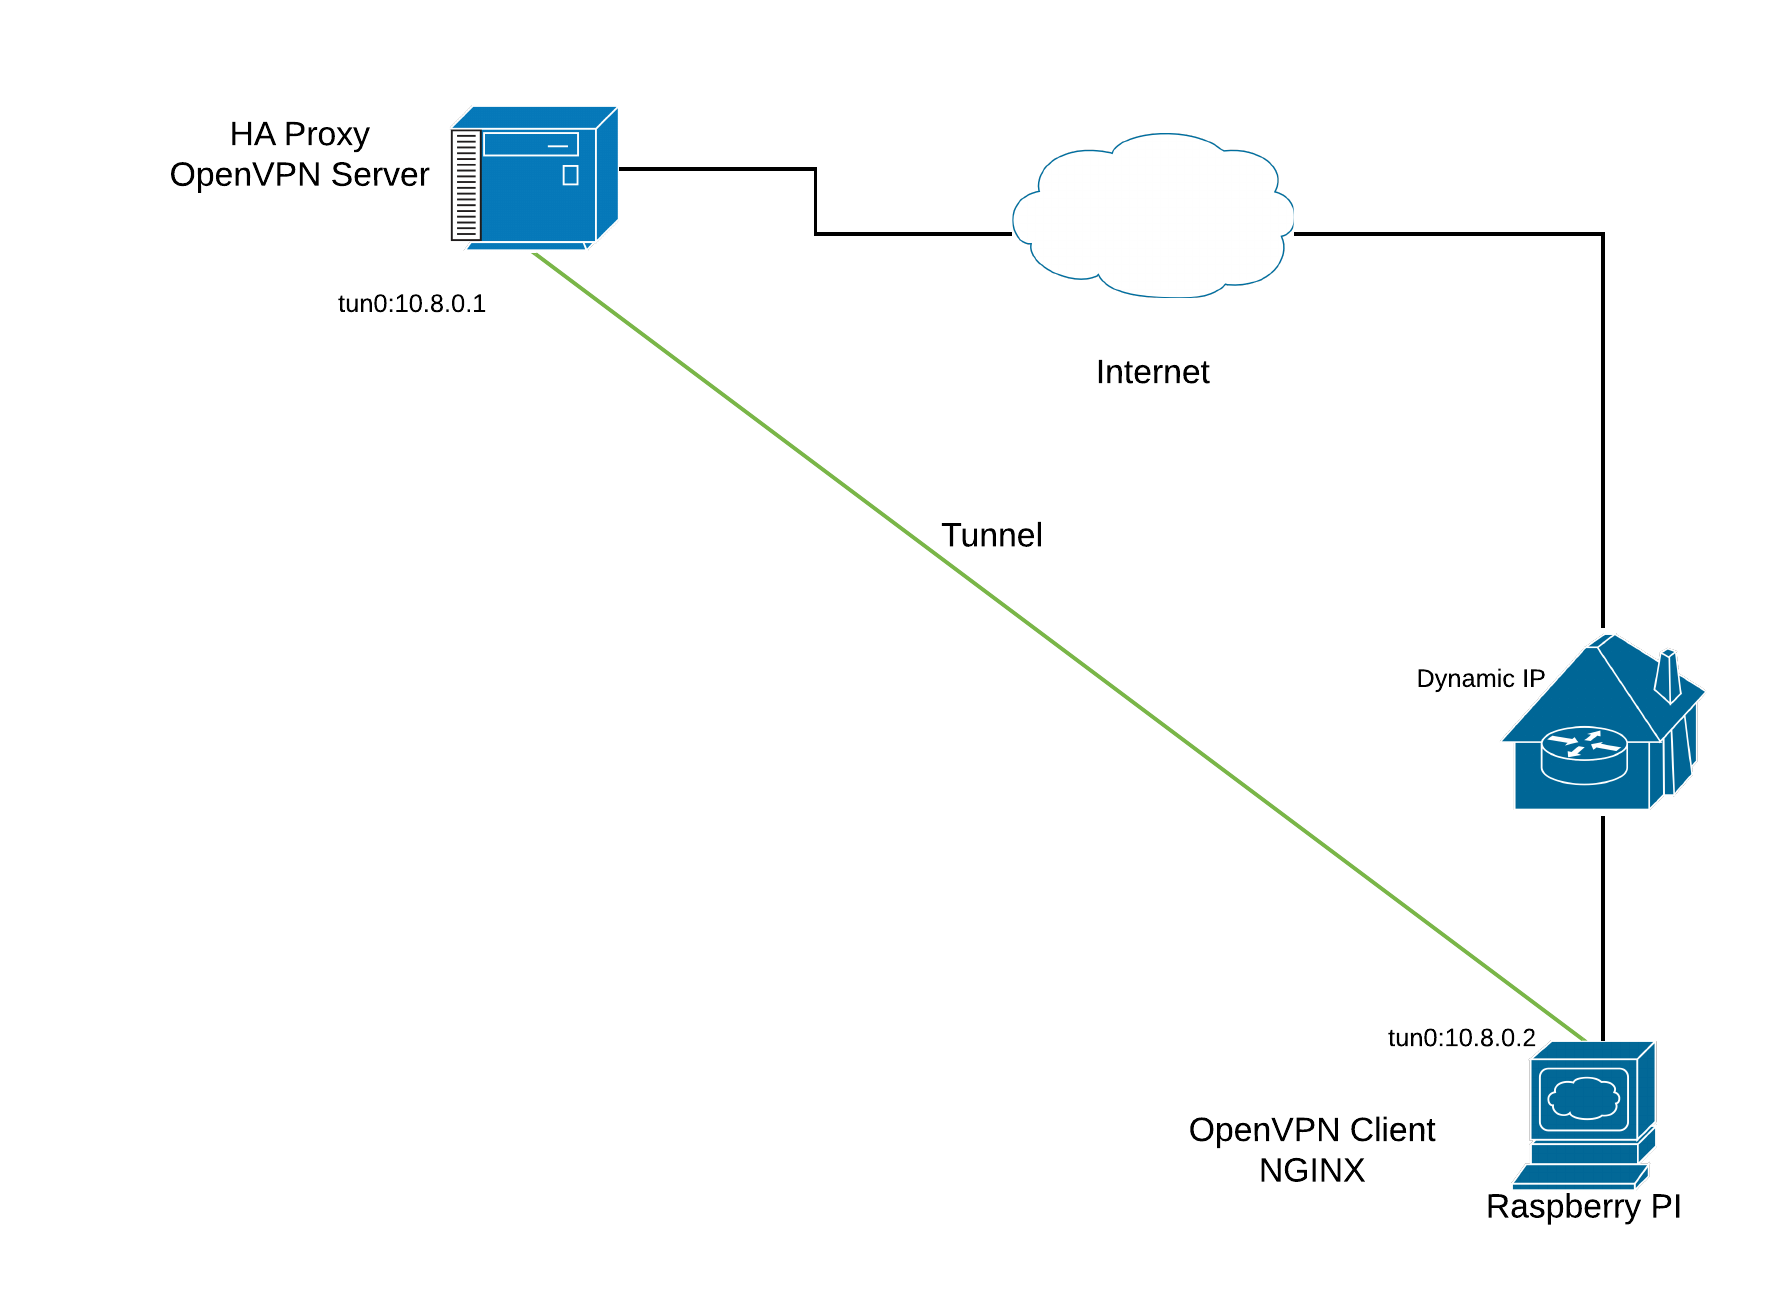
Referring to this topology that we will do Nginx installation at Raspberry Pi device.
Well now it’s time to continue on installation process:
- Install Certbot and the nginx plugin
$ sudo apt install certbot python3-certbot-nginx
- Install the nginx
$ sudo apt install nginx
- Create the configuration for Virtual Host
server {

listen 80;
server_name www.iolib.link iolib.link;

root /home/pi/web;

index index.html

}- Run certbot
budi@lab:/etc/nginx/conf.d$ sudo certbot
Saving debug log to /var/log/letsencrypt/letsencrypt.log
Plugins selected: Authenticator nginx, Installer nginx

Which names would you like to activate HTTPS for?
- - - - - - - - - - - - - - - - - - - - - - - - - - - - - - - - - - - - - - - -
1: iolib.link
- - - - - - - - - - - - - - - - - - - - - - - - - - - - - - - - - - - - - - - -
Select the appropriate numbers separated by commas and/or spaces, or leave input
blank to select all options shown (Enter 'c' to cancel): 1

Obtaining a new certificate
Performing the following challenges:
http-01 challenge for iolib.link
Waiting for verification...
Cleaning up challenges
Deploying Certificate to VirtualHost /etc/nginx/conf.d/iolib.conf
Enter 1 if you want to modify SSL settings manually.
Enter 2 if you want certbot manage the SSL settings.
Please choose whether or not to redirect HTTP traffic to HTTPS, removing HTTP access.
- - - - - - - - - - - - - - - - - - - - - - - - - - - - - - - - - - - - - - - -
1: No redirect - Make no further changes to the webserver configuration.
2: Redirect - Make all requests redirect to secure HTTPS access. Choose this for
new sites, or if you're confident your site works on HTTPS. You can undo this
change by editing your web server's configuration.
- - - - - - - - - - - - - - - - - - - - - - - - - - - - - - - - - - - - - - - -
Select the appropriate number [1-2] then [enter] (press 'c' to cancel):2

Redirecting all traffic on port 80 to ssl in /etc/nginx/conf.d/iolib.conf

- - - - - - - - - - - - - - - - - - - - - - - - - - - - - - - - - - - - - - - -
Congratulations! You have successfully enabled https://iolib.link

You should test your configuration at:
https://www.ssllabs.com/ssltest/analyze.html?d=iolib.link
- - - - - - - - - - - - - - - - - - - - - - - - - - - - - - - - - - - - - - - -
IMPORTANT NOTES:
- Congratulations! Your certificate and chain have been saved at:
/etc/letsencrypt/live/iolib.link/fullchain.pem
Your key file has been saved at:
/etc/letsencrypt/live/iolib.link/privkey.pem
Your cert will expire on 2021-06-12. To obtain a new or tweaked
version of this certificate in the future, simply run certbot again
with the "certonly" option. To non-interactively renew *all* of
your certificates, run "certbot renew"
- If you like Certbot, please consider supporting our work by:

Donating to ISRG / Let's Encrypt: https://letsencrypt.org/donate
Donating to EFF: https://eff.org/donate-le
How iolib.conf looks like?
server {


server_name iolib.link;
root /home/budi;
index index.html;

listen 443 ssl; # managed by Certbot
ssl_certificate /etc/letsencrypt/live/iolib.link/fullchain.pem; # managed by Certbot
ssl_certificate_key /etc/letsencrypt/live/iolib.link/privkey.pem; # managed by Certbot
include /etc/letsencrypt/options-ssl-nginx.conf; # managed by Certbot
ssl_dhparam /etc/letsencrypt/ssl-dhparams.pem; # managed by Certbot

}
server {


if ($host = iolib.link) {
return 301 https://$host$request_uri;
} # managed by Certbot


listen 80;
server_name iolib.link;
return 404; # managed by Certbot


}
Cerbot add this file /etc/letsencrypt/options-ssl-nginx.conf which is not recommend to be edited and we can see it’s still enable TLSv1.3
$ cat /etc/letsencrypt/options-ssl-nginx.conf
# This file contains important security parameters. If you modify this file
# manually, Certbot will be unable to automatically provide future security
# updates. Instead, Certbot will print and log an error message with a path to
# the up-to-date file that you will need to refer to when manually updating
# this file.

ssl_session_cache shared:le_nginx_SSL:10m;
ssl_session_timeout 1440m;
ssl_session_tickets off;

ssl_protocols TLSv1.2 TLSv1.3;
ssl_prefer_server_ciphers off;

ssl_ciphers "ECDHE-ECDSA-AES128-GCM-SHA256:ECDHE-RSA-AES128-GCM-SHA256:ECDHE-ECDSA-AES256-GCM-SHA384:ECDHE-RSA-AES256-GCM-SHA384:ECDHE-ECDSA-CHACHA20-POLY1305:ECDHE-RSA-CHACHA20-POLY1305:DHE-RSA-AES128-GCM-SHA256:DHE-RSA-AES256-GCM-SHA384:ECDHE-RSA-AES128-SHA";
Now restart the Nginx using this command
$ sudo systemctl restart nginx
Verify certbot autorenewal
pi@dev-pi:~ $ sudo systemctl status certbot.timer
● certbot.timer - Run certbot twice daily
Loaded: loaded (/lib/systemd/system/certbot.timer; enabled; vendor preset: enabled)
Active: active (waiting) since Tue 2021-12-21 11:29:10 WIB; 1h 55min ago
Trigger: Tue 2021-12-21 23:41:20 WIB; 10h left
Triggers: ● certbot.service

Dec 21 11:29:10 dev-pi systemd[1]: Started Run certbot twice daily.
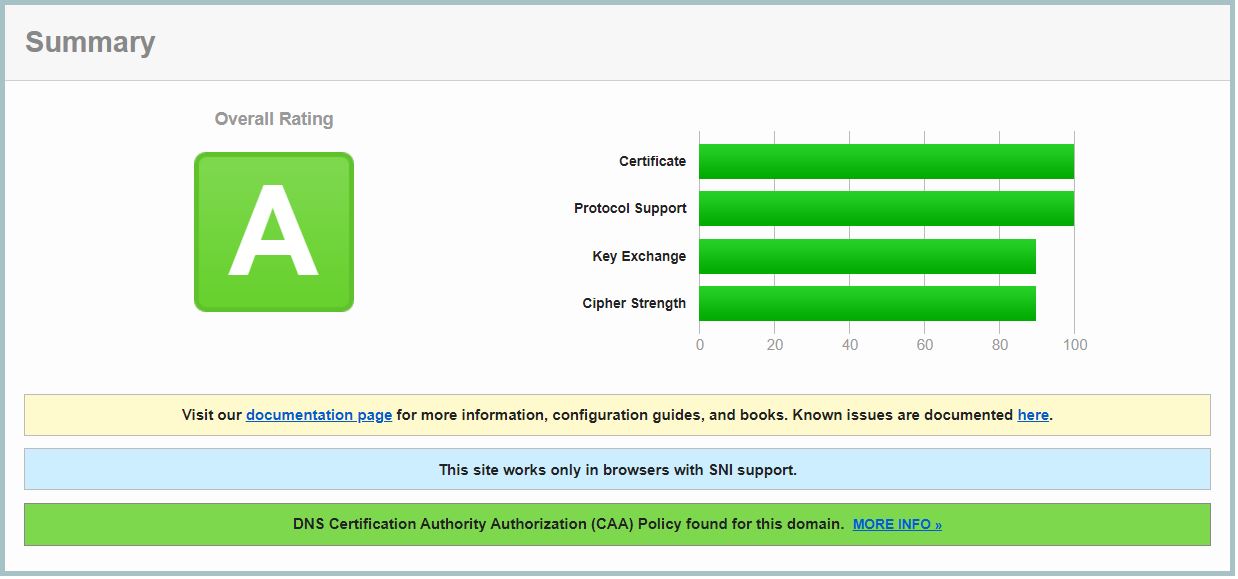
Now, let’s test how good we are configuring the SSL parameter
Browse to SSL Test and enter www.iolib.link and see the result : Grade A
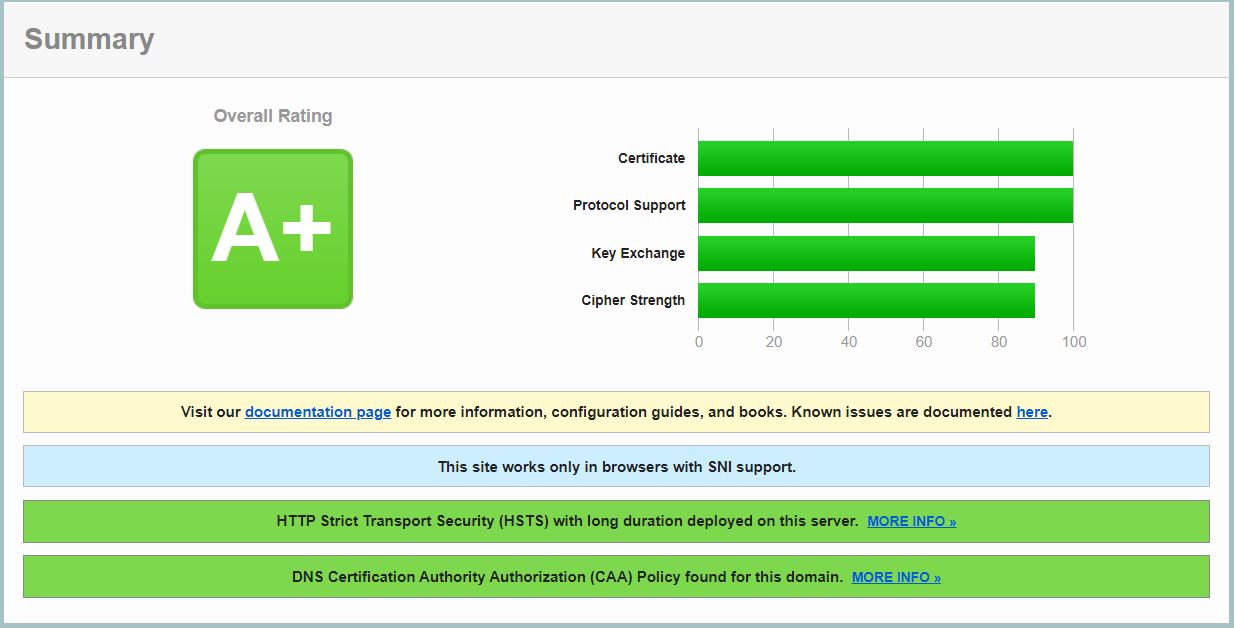
How about improving the result to Grade A+
Put comment infront of include /etc/letsencrypt/options-ssl-nginx.conf; # managed by Certbot
#include /etc/letsencrypt/options-ssl-nginx.conf; # managed by Certbot
and change it with
include snippets/ssl-param.conf;
so what is inside the ssl-param.conf?
$ cat /etc/nginx/snippets/ssl-param.conf
ssl_protocols TLSv1.2;
ssl_prefer_server_ciphers on;
ssl_ciphers "ECDHE-ECDSA-CHACHA20-POLY1305:ECDHE-RSA-CHACHA20-POLY1305:ECDHE-ECDSA-AES128-GCM-SHA256:ECDHE-RSA-AES128-GCM-SHA256:ECDHE-ECDSA-AES256-GCM-SHA384:ECDHE-RSA-AES256-GCM-SHA384:DHE-RSA-AES128-GCM-SHA256:DHE-RSA-AES256-GCM-SHA384:ECDHE-ECDSA-AES128-SHA256:ECDHE-RSA-AES128-SHA256:ECDHE-ECDSA-AES128-SHA:ECDHE-RSA-AES256-SHA384:ECDHE-RSA-AES128-SHA:ECDHE-ECDSA-AES256-SHA384:ECDHE-ECDSA-AES256-SHA:ECDHE-RSA-AES256-SHA:DHE-RSA-AES128-SHA256:DHE-RSA-AES128-SHA:DHE-RSA-AES256-SHA256:DHE-RSA-AES256-SHA:ECDHE-ECDSA-DES-CBC3-SHA:ECDHE-RSA-DES-CBC3-SHA:EDH-RSA-DES-CBC3-SHA:AES128-GCM-SHA256:AES256-GCM-SHA384:AES128-SHA256:AES256-SHA256:AES128-SHA:AES256-SHA:DES-CBC3-SHA:!DSS";
ssl_ecdh_curve secp384r1; # Requires nginx >= 1.1.0
ssl_session_timeout 10m;
ssl_session_cache shared:SSL:10m;
ssl_session_tickets off; # Requires nginx >= 1.5.9
# ssl_stapling on; # Requires nginx >= 1.3.7
# ssl_stapling_verify on; # Requires nginx => 1.3.7
resolver 8.8.8.8 8.8.4.4 valid=300s;
resolver_timeout 5s;
add_header X-Frame-Options DENY;
add_header X-Content-Type-Options nosniff;
add_header X-XSS-Protection "1; mode=block";
add_header Strict-Transport-Security 'max-age=31536000; includeSubDomains; preload' always;
Restart the Nginx, go back to SSL test web site and we will see Grade A+
I believe infrastructure part is done.
Next topic will go more detail on Raspberry Pi itself.